Button Wreath Ornament: Cute & Easy Christmas DIY
I love the holiday season! So many fun projects to create and I am always looking for some new ornaments to make! If you are looking for a quick, inexpensive, and super cute DIY Christmas project that you can gift to family, friends (and even teachers!) or keep for yourself, then check these out! These button wreath ornaments are the perfect compliment to my popular Button Tree and Snowman Christmas Ornaments. They use a lot of the same supplies and tools, so you can create a lot of ornament options for all of your gifting this season or personal decorating needs.
This project also works well for kids (no mess…glitter…glue) with a bit of help from adults in finishing up the wreath. And it makes a great gift for their teachers because who needs another mug!
Ok, let’s play with some buttons!
MORE CHRISTMAS ORNAMENTS YOU CAN MAKE:

BUTTON WREATH ORNAMENT
WHAT YOU’LL NEED:
- Buttons – (assorted colors and sizes)
- 20 Gauge Wire (1 – 15″ Piece)
- Wire Cutter
- Round Nose Pliers
- Chain Nose Pliers
- Thin Ribbon for bow (I used 0.2″)
- Additional String for hanging (Optional-not shown)
- Scissors

MATERIAL TIPS
- Buttons – The colors and sizes will vary based on what color you want your wreath to be. For the tutorial I used greens and blues. I also created a second one in shades of white and cream with some shiny and some matte finish. You will need about 100 buttons total (not an exact number, but it should give you an idea of what you will need for a wreath ornament in the size shown).
- Wire – The gauge of the wire for this project is important. I chose 20 gauge because it is sturdy enough to handle the adjusting of the shape while still being flexible enough to twist it to finish the wreath.
ORGANIZING THE BUTTONS
If you are going with a random order for the buttons you can skip this step. If, however, you want the button colors and styles evenly distributed around the wreath, read on . It’s pretty quick, but SOOO worth the effort! It also makes threading the buttons on the wire go faster because you don’t need to think about which button goes next.
1. First, group your buttons by similar colors or styles. For my green and blue wreath, it was fairly easy to group by colors. For my white wreath, since everything was white/cream I more specifically grouped by each button style. There were enough of each style that it was worth seeing how many had a lot and how many had only a few, so I could space them out accordingly.

2. Lay out the first group of buttons. It gives you a quick chance to look at it and move them around BEFORE you thread them on the wire. I laid out about a third of the buttons needed for the wreath. NOTE: the first time I created a wreath I did NOT lay them out. It took extra time to remember what I wanted next and when I wasn’t paying attention…because I was looking for the next color…I dumped the WHOLE THING. I strongly suggest laying it out and making your life easier!

THREADING BUTTONS ON WIRE
3. Before you begin threading the buttons on the the wire, make a loop at one end with your fingers or a pliers. This will keep the buttons from sliding right off the end.

4. Once you have a loop at the end of the wire, start threading the buttons. For consistency decide if they will all go in one direction or flip back and forth (I went in one direction).

5. Once the first group has been strung, push it down towards the loop, so it doesn’t fall off.

6. Lay out the next group of buttons, string them on the wire and push them down. This is also a good time to check and see what the wreath is looking like and guesstimate if the entire next group of buttons is needed (It was in my case).

7. Lay out the final group of buttons, string them on the wire and push them down. Check the size and add/remove buttons as needed to get the desired size (there’s no right or wrong size here…whatever works for you).

FINISHING BUTTON WREATH
Once all of the buttons are on the wire, the 2 ends can be “tied” together to create the wreath shape and a loop can be created for hanging the ornament.
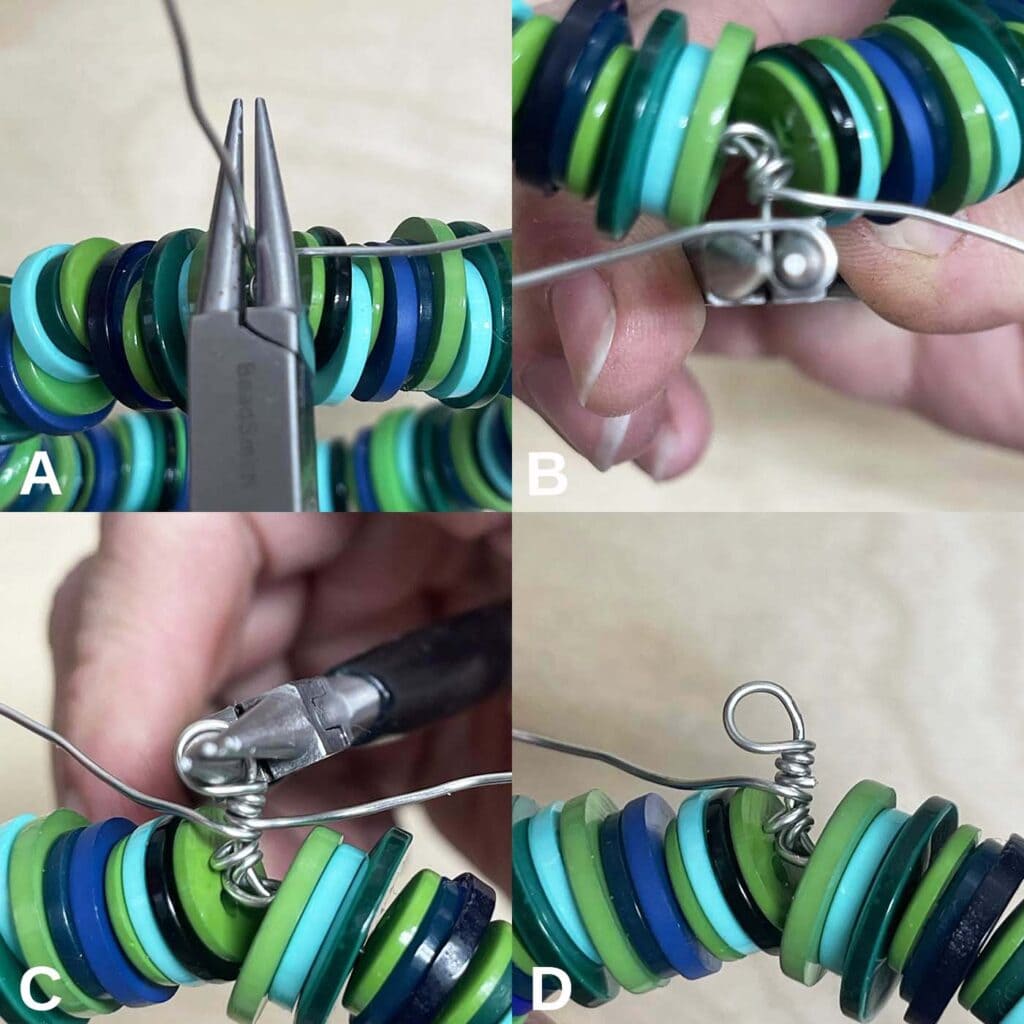
8. To “tie” the ends of the wire together, wrap one wire over the other and then around it several times:
- A) Cross the ends and pull together, so the buttons are close.
- B) Just like tying your shoes, wrap one wire around the other and pull it snug.
- C) Hold the wire that was wrapped around with the chain nose pliers.
- D) Using your fingers or the round nose pliers, take the other wire and continue to wrap it around that wire being held by the chain nose pliers several times again to make sure it cannot pull away.

9. To create your loop and secure the second wire:
- A) Switch pliers: hold the wire that was held with the chain nose pliers with the round nose pliers (close to the base).
- B) Wrap the wire around the pliers to create the loop.
- C) While still holding the loop, take the tail of that wire and wrap it around the base of the loop a few times snuggly.
- D) Cut the rest of the wire with the cutters.
10. Using the pliers, bend the loop, so it is now straight up.

11. Wrap the other wire around several more times to cover any gaps under the loop and cut the rest of the wire with the cutters.

12. Now that the wreath shape is created and the tightly secured, so it cannot come apart, we can adjust the shape to make it more rounded. Push and pull the ring to create a more even circle (this is why we have 20 gauge wire).

ADDING BOW TO WREATH
13. Cut a nice long piece of the thin ribbon and place it under and through the center of the wreath as in the upper left pic below. Tie it at the base of the loop (this will insure it cannot slip off the loop because its tied to the actual wreath). Then wrap it around the loop and tie it a second time, see bottom pic (this will center the ribbon under the loop, so the bow will be centered).

14. Finish tying the bow and cut the tails.

ADDING STRING FOR HANGING ORNAMENT (OPTIONAL)
15. Once the bow is attached the button wreath ornament is complete, however, there are several ways you can hang it. If you are giving it as a gift I suggest adding a string to the loop, so the recipient can hang it as is. If you are keeping it for yourself you can either add the string or use a metal ornament hook for hanging.

And there we go. Super easy, cute and very inexpensive. Button wreath ornaments make great gifts for anyone (teachers included!) or additions to any Christmas tree.