How To Neon Tie Dye
I love tie dyeing because there are so many bright fun colors to use, so when Tulip came out with a Neon Tie Dye kit I had to give it a try! The instructions from Tulip are a bit different than the traditional tie dye kit that Tulip makes, so I used a bit of trial and error (and a lot of tie dye knowledge) to see what worked best. I also do call out where I differ from Tulip’s instructions and why, just for your reference.
Since we are focused on the brilliant neon colors, I chose the traditional spiral pattern as its the most basic in tie dyeing and I used all 6 colors in the box. I am also using a white Adult Medium 100% cotton t-shirt, but any size shirt will work.
Ok, ready to create a poppin’ neon spiral? Let’s go!

FOR MORE TIE DYE 101 BASICS: HOW TO TIE DYE: THE ULTIMATE GUIDE
TO SEE MORE ITEMS YOU CAN TIE DYE NEON COLORS: 30 THINGS TO TIE DYE
Neon Tie Dye
What you’ll need:
- White Shirt
- Rubber Bands
- Neon Tie Dye Kit (Which Includes Rubber Bands & Gloves)
- Plastic/Rubber Gloves
- Plastic Covering For Work Surface
- Painter’s Tape (optional)
- Baking Tray With Rack (optional)
- Paper Towels/Rags
- Gallon Plastic Bag or Plastic Wrap

PREPPING THE DYES
Dye for traditional tie dyeing starts as a powder (in the package) and then is mixed with water when ready to use. The neon dye, however, comes pre-mixed in squeeze bottles. Give each bottle a shake and prep the bottles as follows:
1. Take the clear plastic cap off each bottle and snip the white plastic nozzle with a scissors to create a hole.

2. Twist off the white nozzle cap and remove the foam seal. Put the nozzle cap back on.

CREATING THE Pattern
For this project, we are going to start with a damp, but not wet, shirt (like we do with other traditional tie dye designs). The shirt could be fresh out of the washing machine. If you washed it a different day, like I usually do, then just dunk the shirt in a bucket of water or sink and wring it out before starting.
NOTE: Tulip recommends dyeing with a dry shirt for this, which in my opinion, doesn’t make sense. If we use a dry shirt the color may be a bit more intense, but it will use a TON more dye to get the shirt covered (and the bottles are already pretty small). As I mentioned earlier, I did this how I normally tie dye and the results were fine.
3. Lay the shirt flat on your work surface. Using a clothespin or your fingers, pinch where the center of the spiral should be and start twisting. Keep twisting while the shirt winds up around the center.
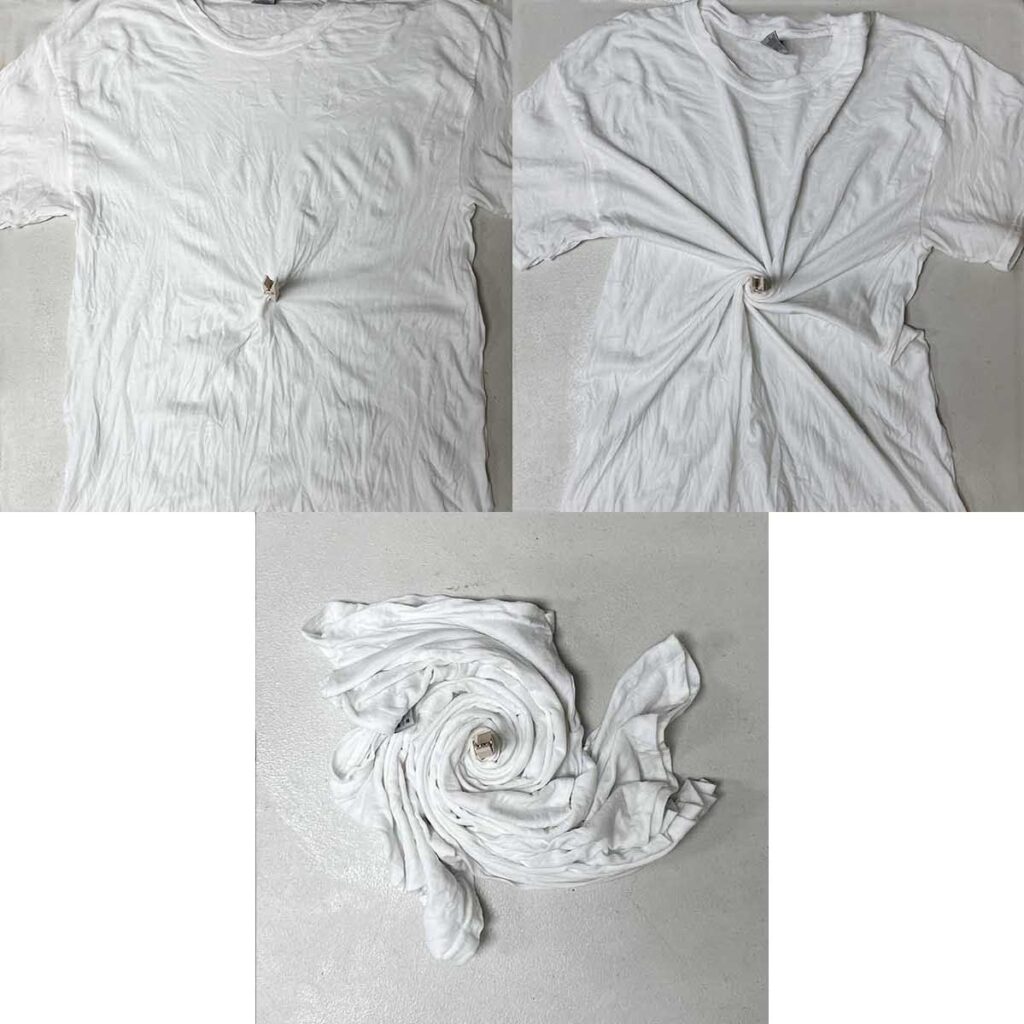
TIP: Personally, I like using a clothespin over a fork or your fingers. I like that the clothespin acts as a handle, making it easier to hold the twist (especially for small/kid hands). Items like forks or a dowel can damage the shirt fabric if not used carefully enough.
4. Once the shirt is completely twisted up, remove the clothespin. Place the first rubber band around the spiral by carefully sliding it under/over the shirt and across the center of the spiral. Add the second and third rubber bands as shown below, so it resembles a 6 slice pizza. Don’t worry if it looks a bit messy. We’ll fix that in the next step.
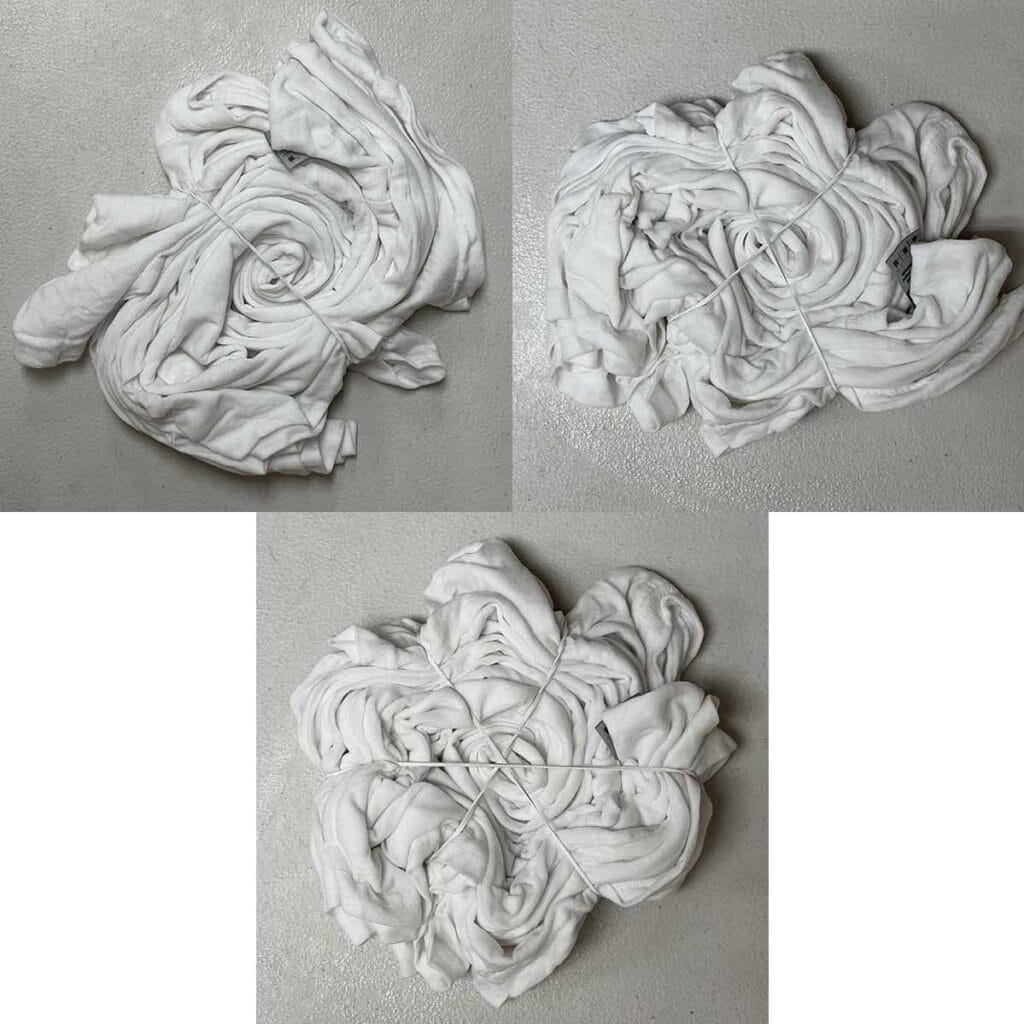
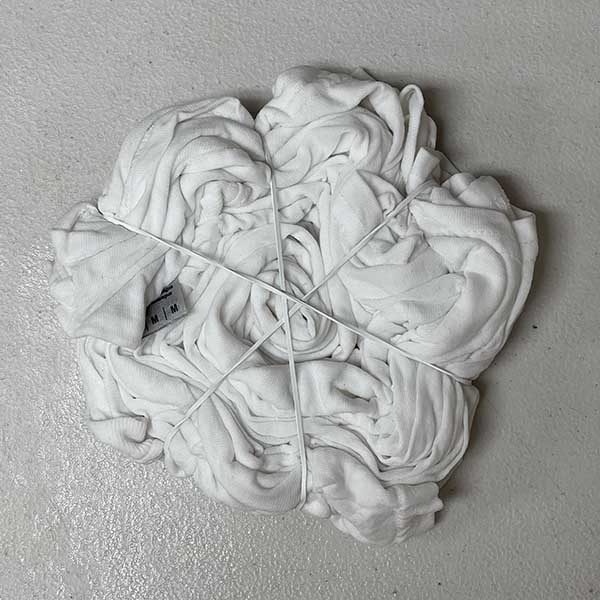
5. Once you have the 3 rubber bands on, now is the time to adjust them, so that they are evenly spaced around the shirt. You can also tuck any loose ends into the rubber bands, so the circle shape is nice and tight.
Dyeing The Shirt
Baking sheet/rack versus just a workspace covered in plastic: I have dyed MANY shirts on just a covered workspace. As long as you have a ton of paper towels and are careful, you will be fine. It is, however, MUCH easier and more environmentally friendly (i.e. paper towel usage) if you use a baking sheet and rack because any excess dye goes directly onto the pan, away from your shirt, and you barely need to use any paper towels. If you plan on tie dyeing a number of items now or in the future I strongly suggest the investment. (Also, works great for other messy crafts!)
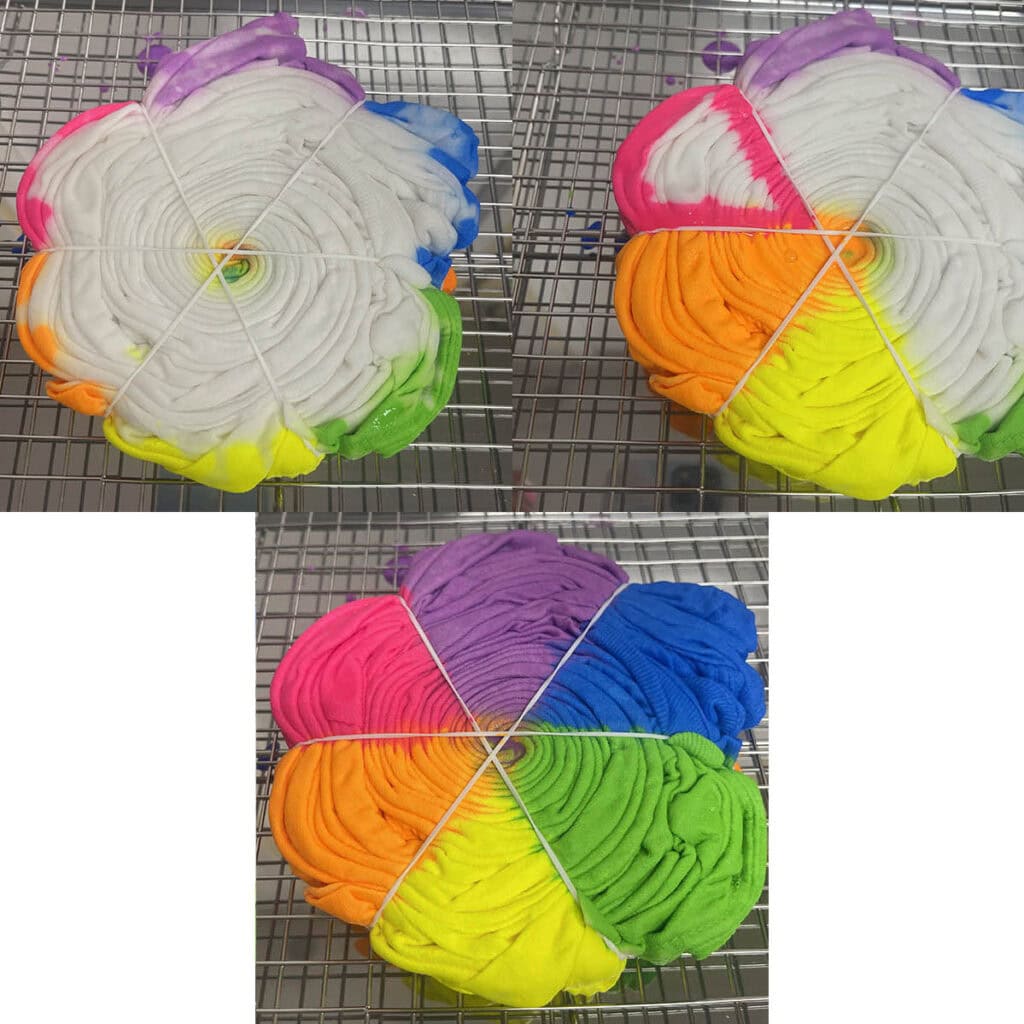
6. Set your shirt on the baking sheet/cooling rack or covered workspace and put on your gloves. Start with your lightest or weakest color which is yellow and fill in a wedge of the shirt. Make sure to add extra dye and let it soak in, so it can get to the center of the shirt. NOTE: The neon dye is thicker than traditional dye, so it takes longer to soak in (as you can see in the orange wedge). Patience is key to getting a few rounds of dye to soak in, so you’ll have color throughout the shirt.

7. Continue to add the rest of the colors, working your way around the shirt. TIP: If you are using the baking sheet, you can turn the sheet and not have to touch the shirt while dyeing.

8. When you have finished dyeing the first side of the shirt, carefully turn it over. You will want to wipe up any access dye on the rack or workspace before laying the shirt down. Repeat the dyeing process starting with the lightest color again. TIP: The neon dye is thicker, so you can actually outline and fill in each wedge, see the pink wedge.
9. Once both sides of the shirt have been dyed, carefully place it in the gallon plastic bag or wrap it in plastic wrap. Personally I prefer the plastic bag as you can easily seal it, label it (if you are dyeing more than one item) and move it if needed without worrying about dye leaking out.
HOW TO CURE THE NEON TIE DYE
Normally, we let tie dye shirts sit for minimally 6-8 hours and up to 24 hours max in the plastic bag, so the dye can cure (which helps produce the brightest colors). This is because heat, moisture, and time are all factors in curing dye (See How Long To Let Tie Dye Sit Before Rinsing for more details). The curing for the neon dye is a bit different, however, as Tulip states that the shirt should be dry before washing. To stay true to what I know about curing, but also dry the shirt fully before washing (which I usually never do for traditional tie dye), here’s what I did and it worked pretty well.
10. Let the shirt sit for minimally 6-8 hours and up to 24 hours max in the plastic bag.
11. Carefully take the shirt out of the bag, remove the rubber bands, open it up and lay it out on a covered surface. It could be the same plastic covered surface that you dyed on or something new you set up.
12. When the top side of the shirt is dry, flip the shirt over and let the other side dry.
Rinsing And Washing
Once the shirt is fully dry, it’s time to rinse and wash the shirt. This is an important step as, if done in the wrong order or rushed, it can muddy up the nice colors and pattern you created.
13. Put the shirt in a sink or bucket (something that can get dirty and won’t stain). We have a stainless steel kitchen sink, so I use that. Rinse the shirt in COLD water. The cold part is critical because it allows excess dye to wash out slowly while not dyeing the remaining white parts of the shirt.
14. Repeat this rinse process several times until the water is fairly clear.
15. Once the water is fairly clear, repeat the rinse process once more, but with luke warm water (not HOT). This should get the last bit of excess dye out before putting it in a washing machine.
16. Once the shirt is thoroughly rinsed, you can wash it in the washing machine either by itself or with several other rinsed tie dye items. If I’m tie dyeing a bunch of shirts, I will put up to 6 in one load. Wash on warm or cold with a bit of detergent.
17. Hang the shirt to let it air dry. Personally I prefer air drying as it extends the life of the dye color (as they will eventually fade a bit with washing and wear).
NOTE: Wash the shirt by itself or with other tie dye items for the next few washings before adding it in with your other clothes.
And tada! Super bright colors that can be used in a lot of tie dye patterns!
FOR MORE TIE DYE PATTERNS TO TRY: Tie Dye Patterns
