Halloween Canvas Trick Or Treat Bag With A Mirror Faced Ghost
We love fall in this house and all of the fun events that come with it, like apple picking, pumpkin carving, and trick or treating. For trick or treating, we usually give the girls plastic buckets or fabric tote bags to carry their candy and personally I like the tote bags much better. They don’t crack, are light weight, and can be personalized many different ways. This particular canvas trick or treat bag was a fun opportunity to use mirrors (because who doesn’t like shiny things) and a technique called the shisha stitch that I learn decades ago in college.
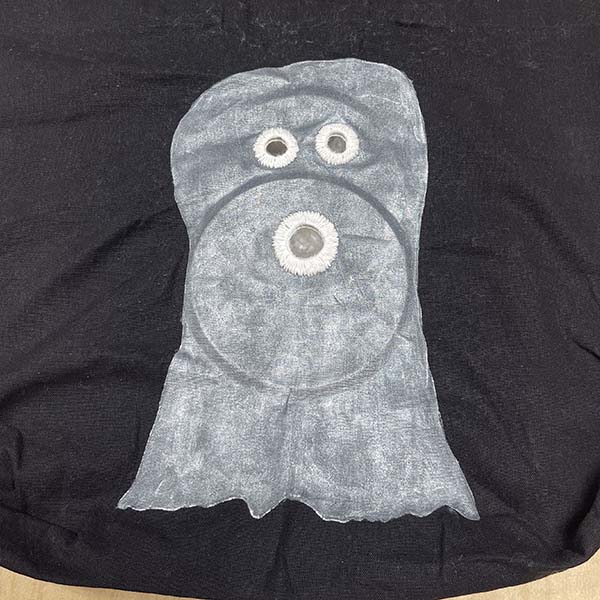
The word Shisha means glass or mirror in Persian and Hindi, and without getting too technical, is an embroidery technique to secure mirrors or other objects of similar flat shape to fabric. Now I know many of you don’t do embroidery, so I have added graphics in addition to the pics and really walked through each step in very straight forward language. Apologies in advance to those of you who do embroidery regularly. And if you do feel that this is a bit too much for you, I also created a second Halloween Ghost Trick Or Treat Bag with painted on eyes and mouth which is super easy to create.
NOTE: There are a lot of details (between the graphics, pics and wording) in this post. When you are ready to actually start I would suggest viewing the post on a tablet or computer screen rather than your phone. Easier to see the details and easier on your eyes.
On a more personal and Eco-friendly note (and I’ve said this in other bag tutorials), I appreciate that the bags get used by everyone in our house all season long (for dance or other sports, or just going out) which is nicer than a bucket once a year. They can also be used the following year, assuming they don’t get too beaten up.
So, let’s get spooky (in a cute way)!

Canvas Trick or Treat Bag With Shisha Face
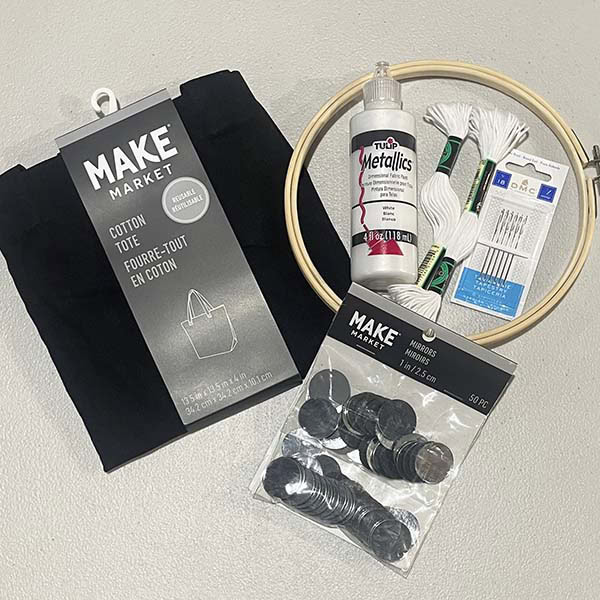
WHAT YOU’LL NEED:
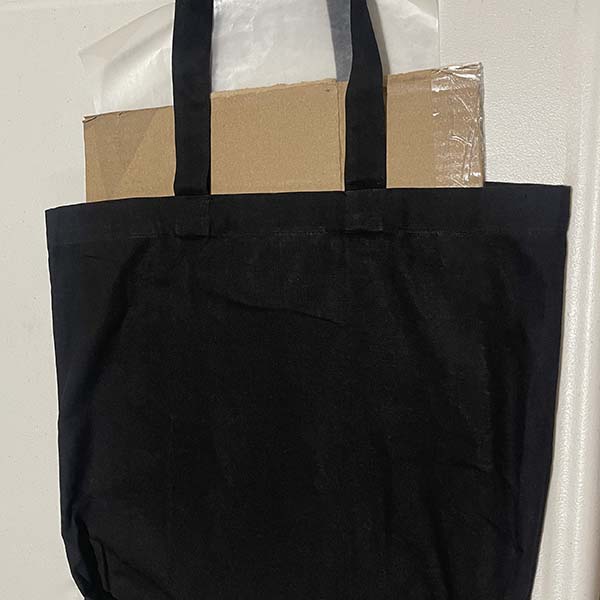
- Black Cotton Tote Bag
- Tulip Metallics Dimensional Fabric Paint (in White)
- Medium Size Flat Brush (I chose 3/4″)
- Embroidery Floss (I chose white)
- Embroidery Needles (I used Size 18)
- Round Mirrors (1″)
- Embroidery Hoop
- Wax Paper
- Piece of Cardboard (that will just fit in bag)
- Pen/Pencil
- Fabric Paint (in White) (Optional)
SUPPLIES NOTES:
- The Tulip Metallics paint really makes this ghost shimmer in a beautiful spooky way, so it pays to search for it. All of the other supplies are interchangeable for whatever brands work for you
- The tote bag should be cotton. There are polyester bags out there as well, but the paint may not adhere to it as well. Something to keep in mind.
- I tested several colors of embroidery thread and chose white in the end, but feel free to experiment with other colors. I also used the embroidery thread as its sold, meaning I did not separate the thread into smaller strands.
PREPPING THE Bag
As with all projects, the prep work is important for these bags. It’s pretty quick, but SOOO worth the effort! Please don’t skip!
1. Iron the bag, so the section you are painting on is flat and wrinkle-free.
2. Place the piece of cardboard inside of the bag. Cut a piece of wax paper (about the size of the cardboard) and stick the wax paper inside of the bag on top of the cardboard. NOTE: in my original picture below, the cardboard is on top of the wax paper. After doing 2 bags, the wax paper is definitely more helpful on the top!
PAINTING GHOST on BAG
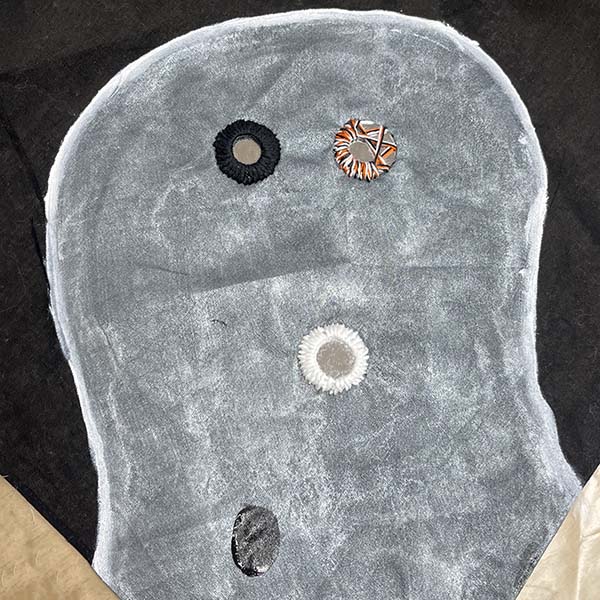
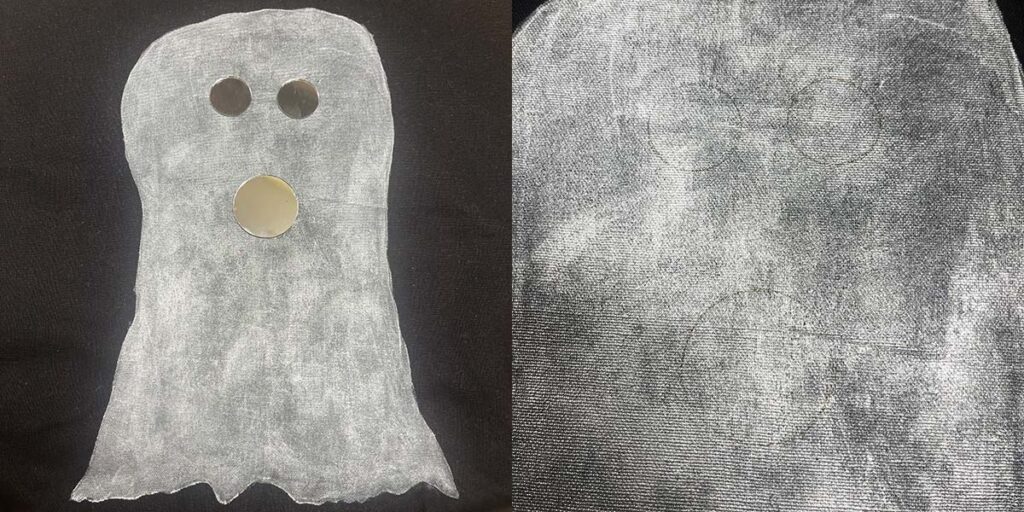
3. Before you start creating the ghost shape, lay the mirrors for the eyes and mouth down. This will help you see where the ghost shape should go and help visualize the finished product.
4. Then, using the nozzle tip of the metallic paint, draw a shape of a ghost on the bag. The fun part is that there is no one “right way” to draw a ghost and if you need to adjust, like I did below, just add more shape until you like it. Once you get a shape you like, take the mirrors off and set aside. Use the medium-sized flat brush to gently brush the paint edges inward. Add more paint and continue to brush it out until the ghost is filled in and not splotchy.
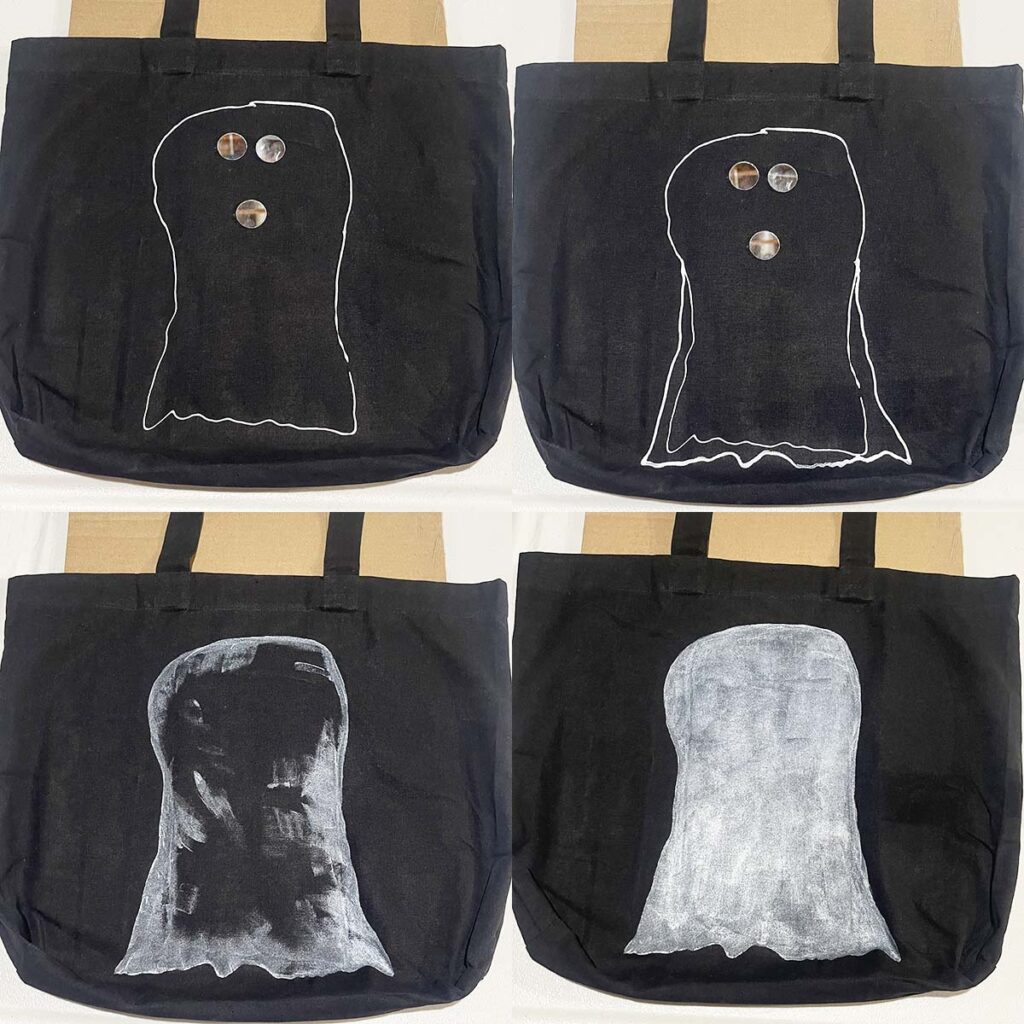
5. Once the paint is fairly dry, carefully open the bag and peal the wax paper off of the bag (and throw away).
PREPPING The GHOST’s FACE
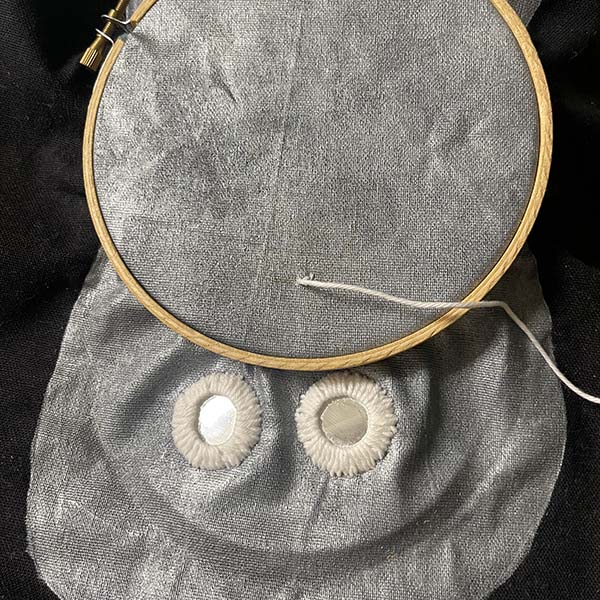
6. When the ghost is completely dry, place the mirrors back on the ghost and trace the shape with a pen or pencil. Don’t worry about it being too dark as the embroidery stitches will cover the lines. NOTE: I found a larger mirror (1.5″) in my craft stash after I started the project, so I used that for the mouth.
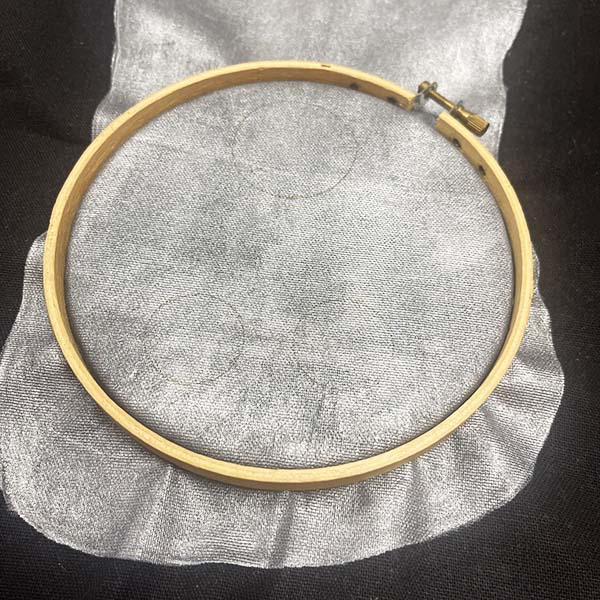
7. Once you have the outlines for the mirrors, set them aside and take the cardboard out of the bag. Loosen up your embroidery hoop, separating it into the outside and inside hoops. Place the inside hoop inside the bag (underneath the outlines) and the outside hoop on top of the bag (over the outlines). Gently snug the hoops together and tighten to secure.
ADDING THE MIRRORS (SHISHA STITCH)
Shisha stitch is made up of two parts: securing the mirror with long stitches over the mirror and more decorative stitching to open up the center of the mirror.
Securing Mirror To Bag
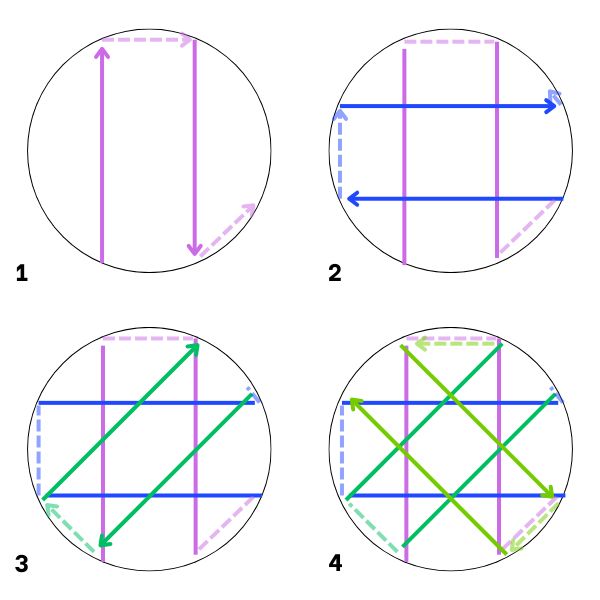
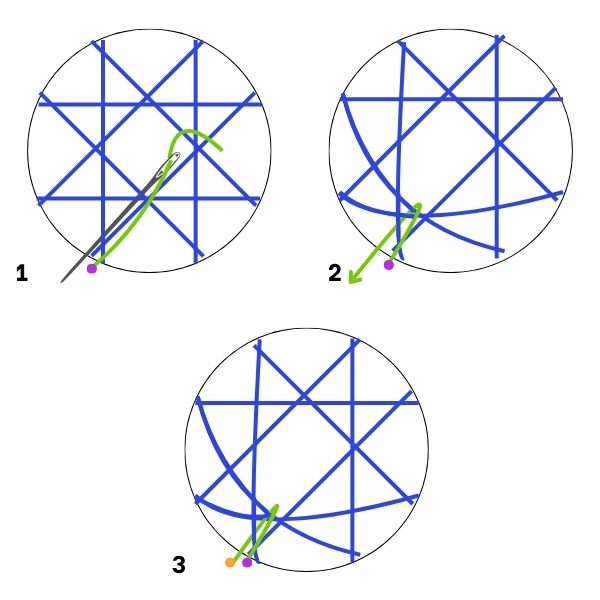
Before we get started with securing the mirror, I want to quickly show you a visual of how we are securing the mirror to the bag (steps 9-12). The solid lines are on top of the mirror and dashed lines are at the back of the fabric.
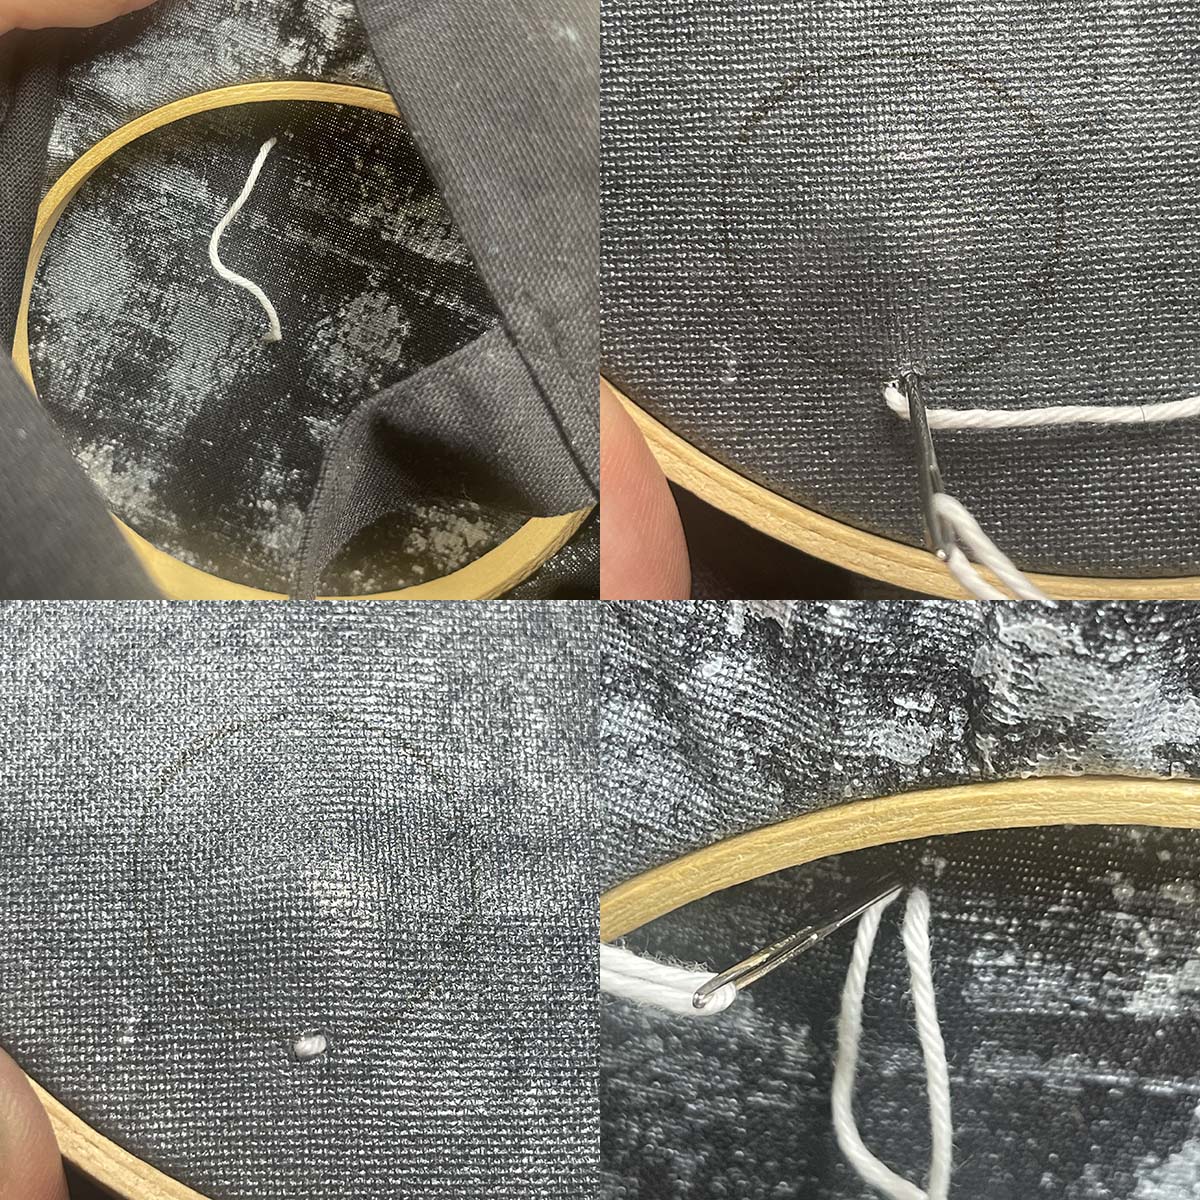
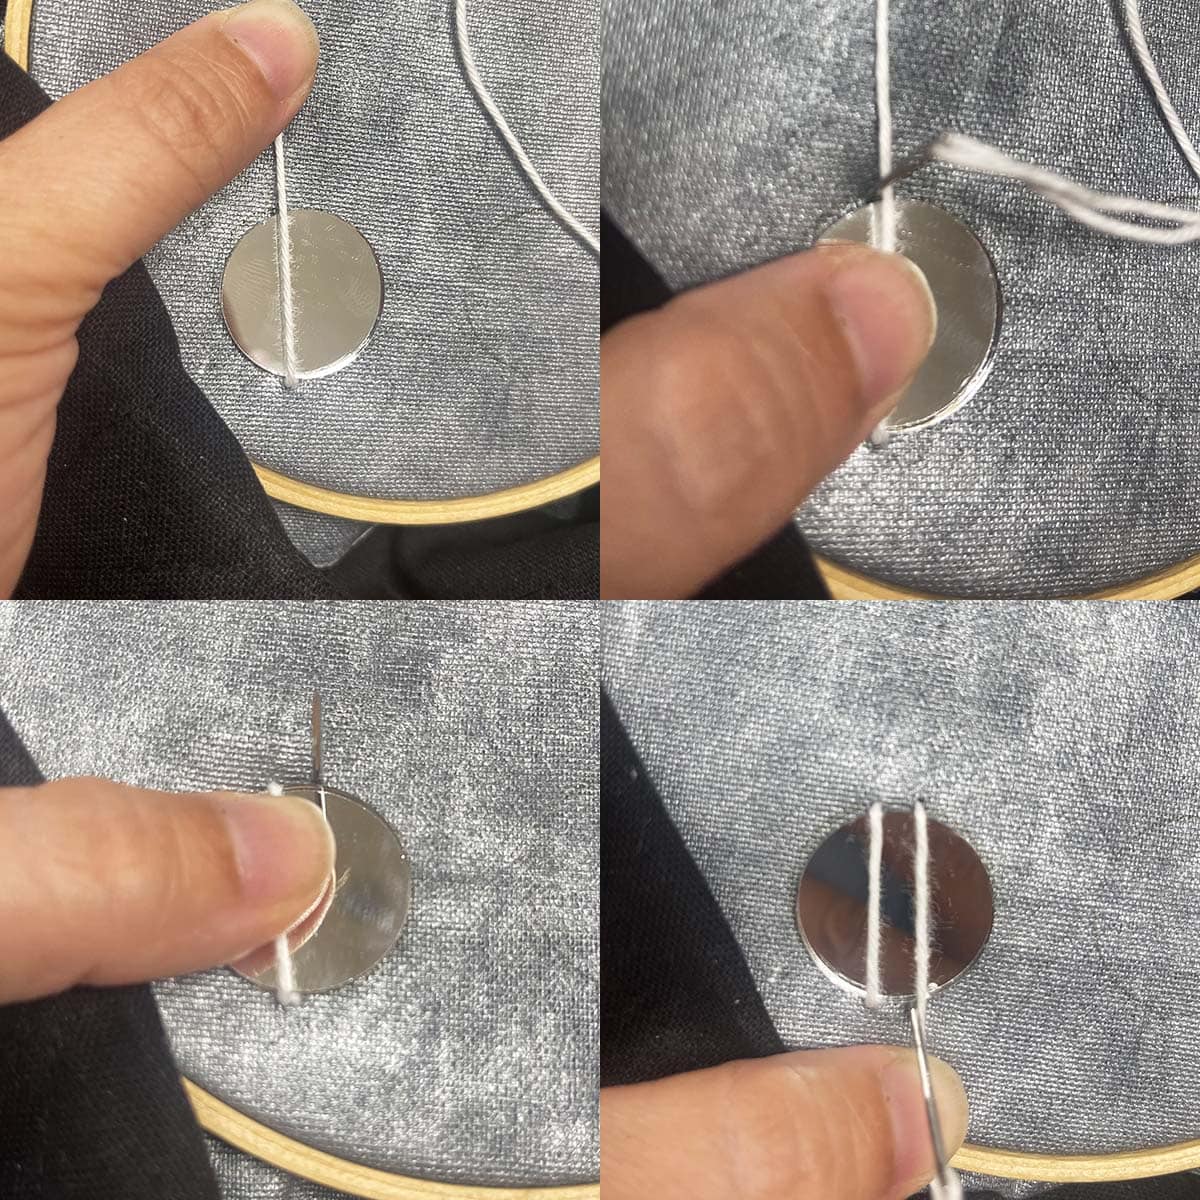
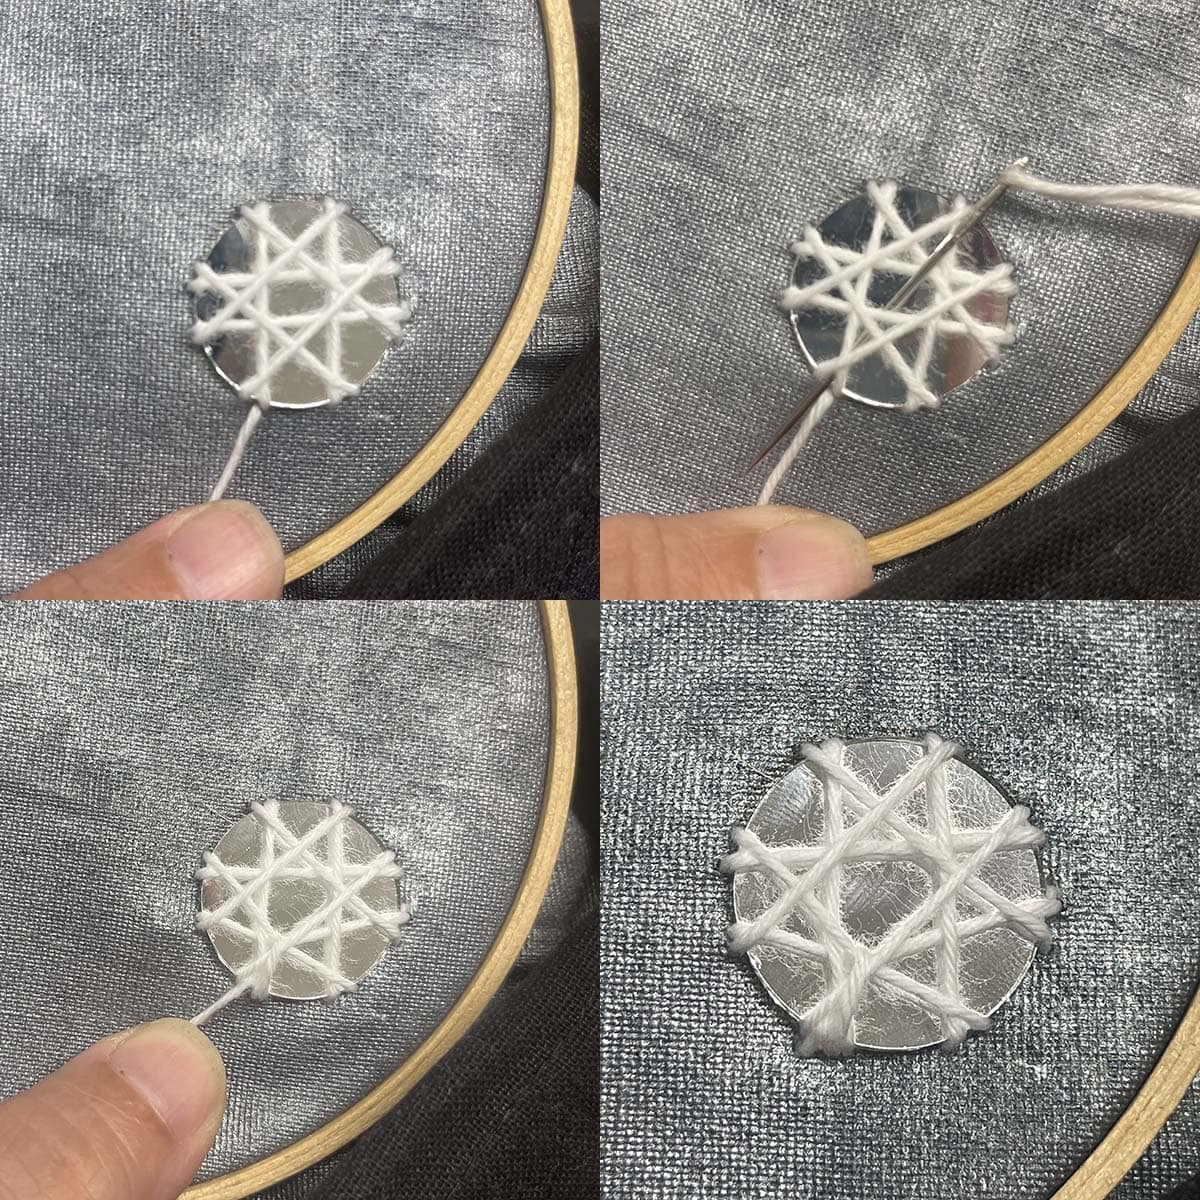
8. To start our shisha stitching (and any embroidery really), you need to secure the thread to the fabric. For this we will use a simple back stitch (a loop in the fabric). Start at the back of the fabric (inside the bag), push the needle through from back to front (be sure to leave a small tail at the back of the fabric)[Top left pic]. Push the needle back through (front to back), close to where you started[Top right pic]. Finally, push the needle back through to the front in about the same place as where you originally started and gently pull it tight to the fabric [Bottom right pic]. NOTE: if the thread still wants to move, make another loop.
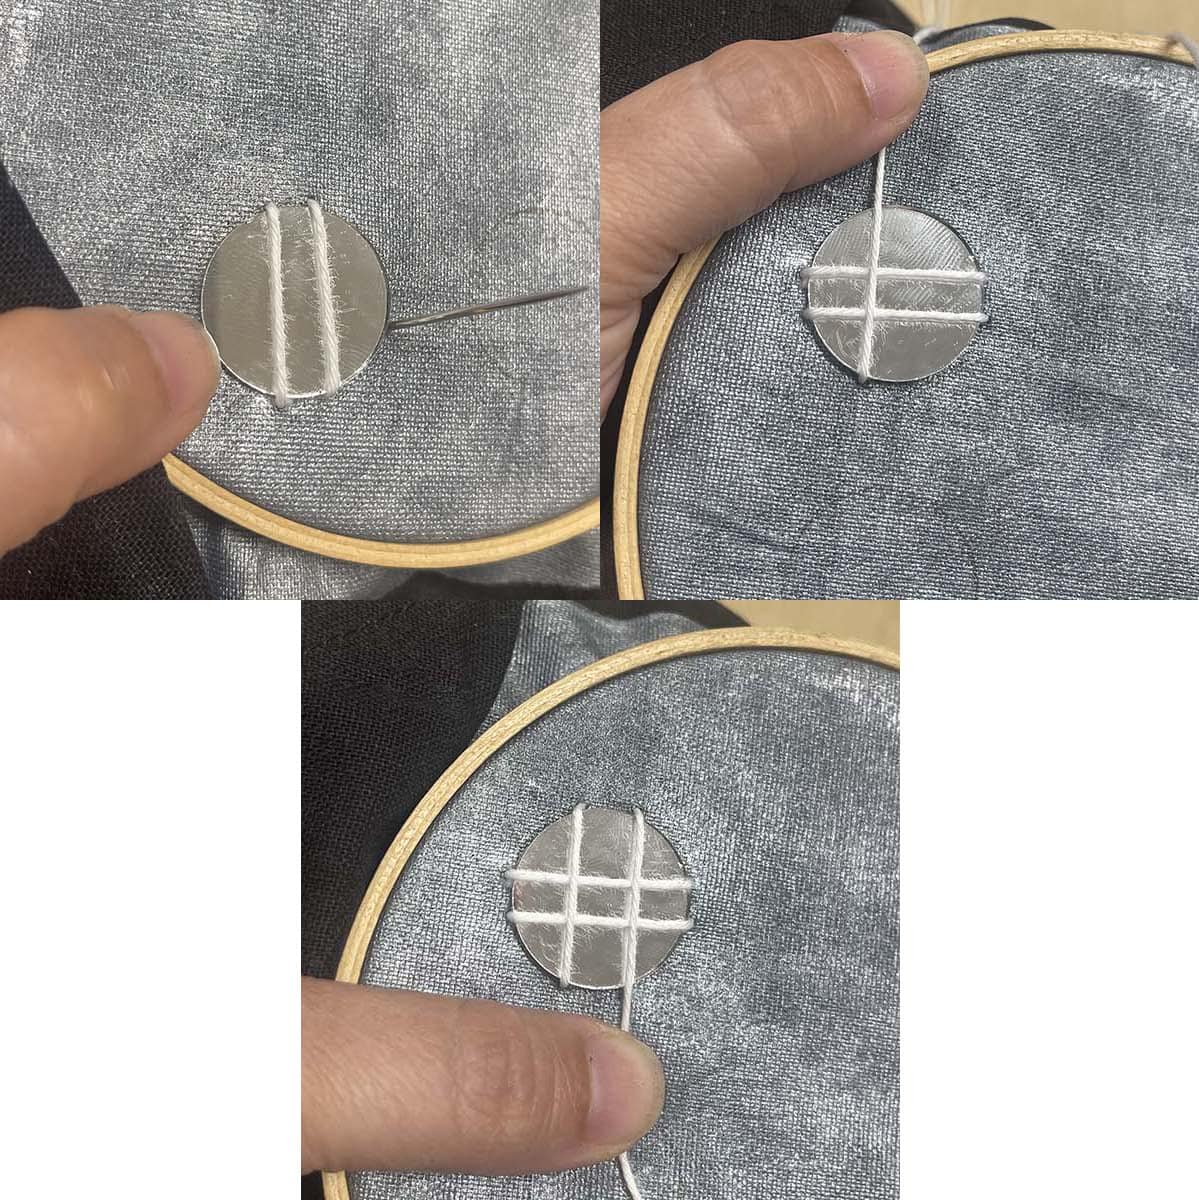
9. (This is step 1 of the graphic) Place the mirror on the fabric outline and pull the thread across the mirror, holding it taut with your finger. I like to do this for each line that secures the mirror, so I can see where the line will be and where I need to place my needle (it takes the guesswork out)[Top left pic]. Push your needle through, front to back, where the thread hits the edge of the mirror and pull the thread taut [Top right pic]. Push the needle back through, back to front, moving it over, so you can create that second vertical line [Bottom left pic]. Hold your thread down as a guide again and secure (pushing your needle through, front to back) [Bottom right pic].
10. (Step 2 of the graphic) Push your needle through to the front, moving it over enough to start the next set of stitches/lines [Top left pic]. If it makes it easier (and it does for me), rotate the bag 90 degrees, so you are creating vertical lines again (like in the pics below). Repeat the steps from #9. You’ve just created a tic-tac-toe grid.
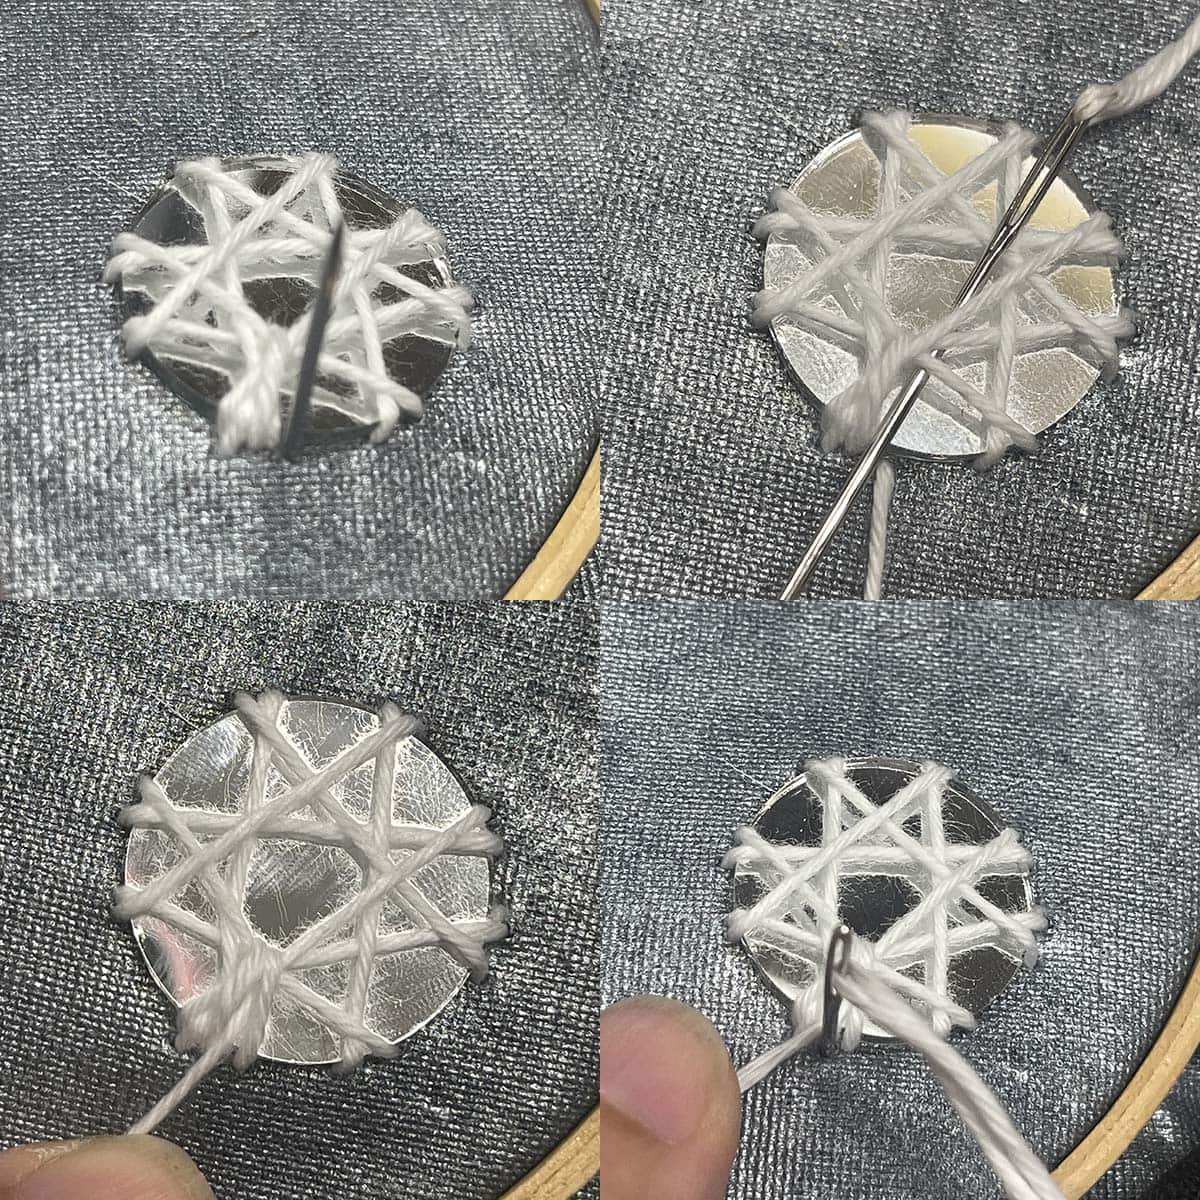
11. (Step 3 of the graphic) Now is the time to create the diagonal lines. Push the needle back to the front, moving it over just slightly this time, so it is close to the last stitch you just completed [Top left pic]. Rotate your bag slightly and repeat the steps from #9.
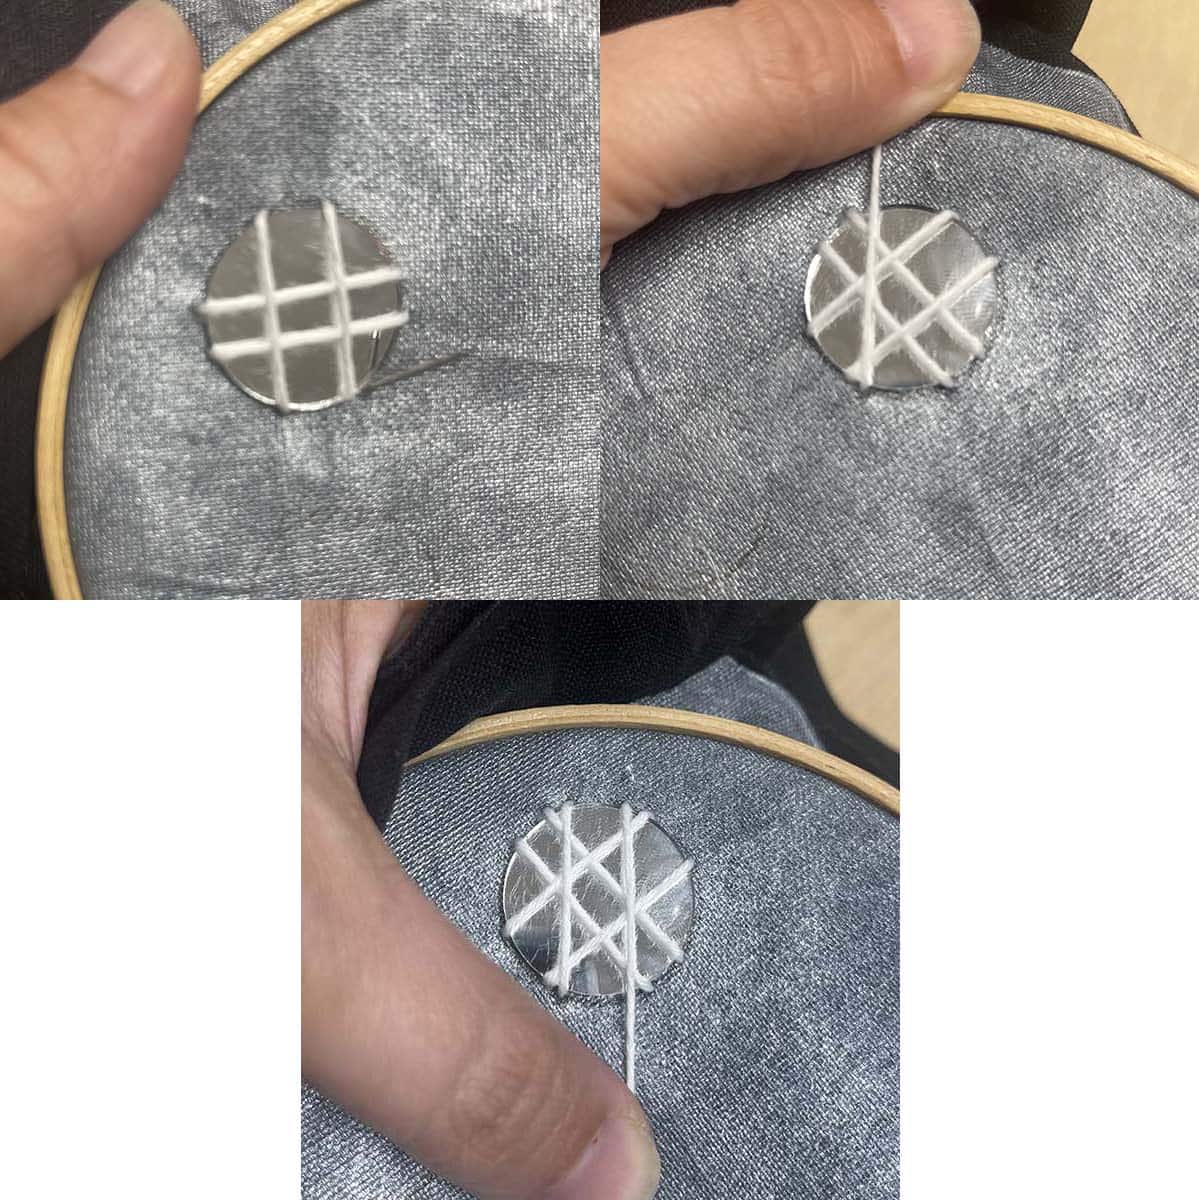
12. (Step 4 of the graphic) Push your needle through to the front, moving it over enough to start the next set of stitches/lines [Left pic]. Rotate the bag again, so you are creating vertical lines. Repeat the steps from #9. You’ve just created the second tic-tac-toe grid. Now the mirror is secured to the fabric.
Decorative Stitches To Open Up Center Of Mirror
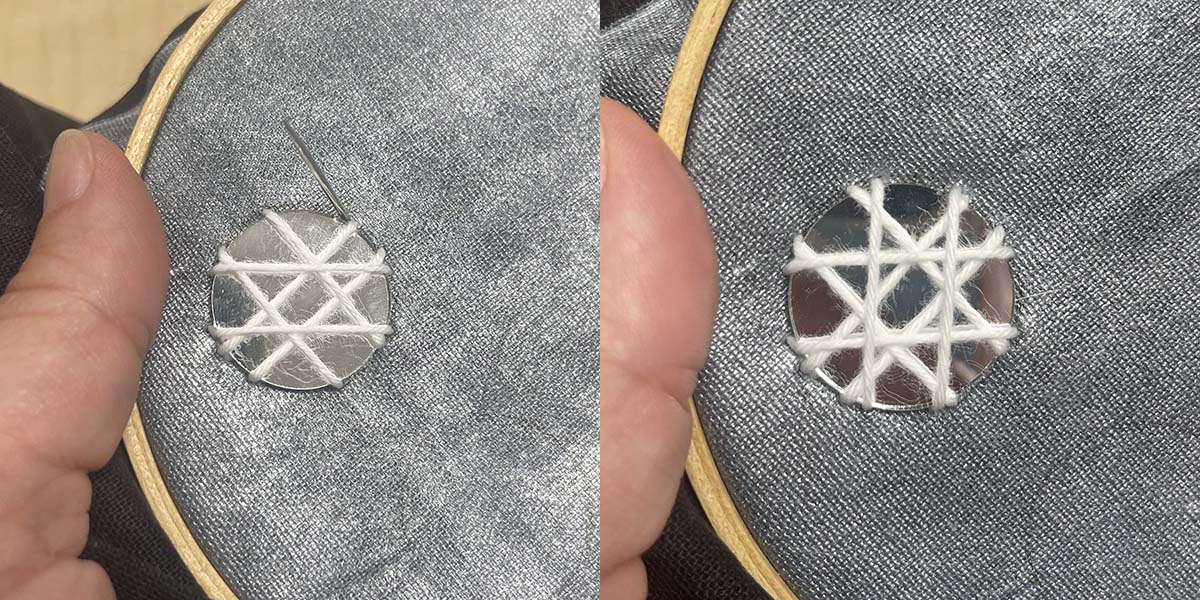
The decorative stitches are fairly simple, just tedious, as there are a lot of them to go around the mirror (covering its edge). Take your time, the more you do, the faster you get. We will be creating these stitches in a counter clockwise motion around the mirror. TIP: the amount of tension here is important. You want to pull gently to open up the center, but not too much so one edge becomes thin and another thick.
Again, here is a graphic to help you visualize the stitch. The purple dot is the starting point. The yellow dot is the end point back into the fabric.
13. Use a finger to hold the thread taut [Top left pic]. With the other hand, slide the needle from the center of the mirror, behind the securing stitches, to the outside (where the thread comes out of the fabric) [Top right pic-Step#1 of graphic]. IMPORTANT: make sure the needle ends up to the left of the thread (or more clockwise). When you pull the thread, the stitch should be to the right of it [Bottom left pic-Step#2 of graphic]. Finish the stitch by sticking the needle back into the fabric [Bottom right pic-Step#3 of graphic]. As you can see in the grapic (#3) and the pic, the final point is slightly farther away from the mirror. (Looks nice staggered, but also helps the stitches not get too bunched up as you go around the mirror)
14. Moving onto the second stitch, push the needle up, slightly to the right (counter clockwise) of the first stitch [Top left pic]. Repeat step 13.
15. Continue creating stitches, moving around the mirror. Again, pay attention to the tension of each stitch, so they are evenly sized. NOTE: the more you do it the better you get. My second and third mirrors always look a bit nicer (and this IS A GHOST after all, so a bit messy adds to the character I think).
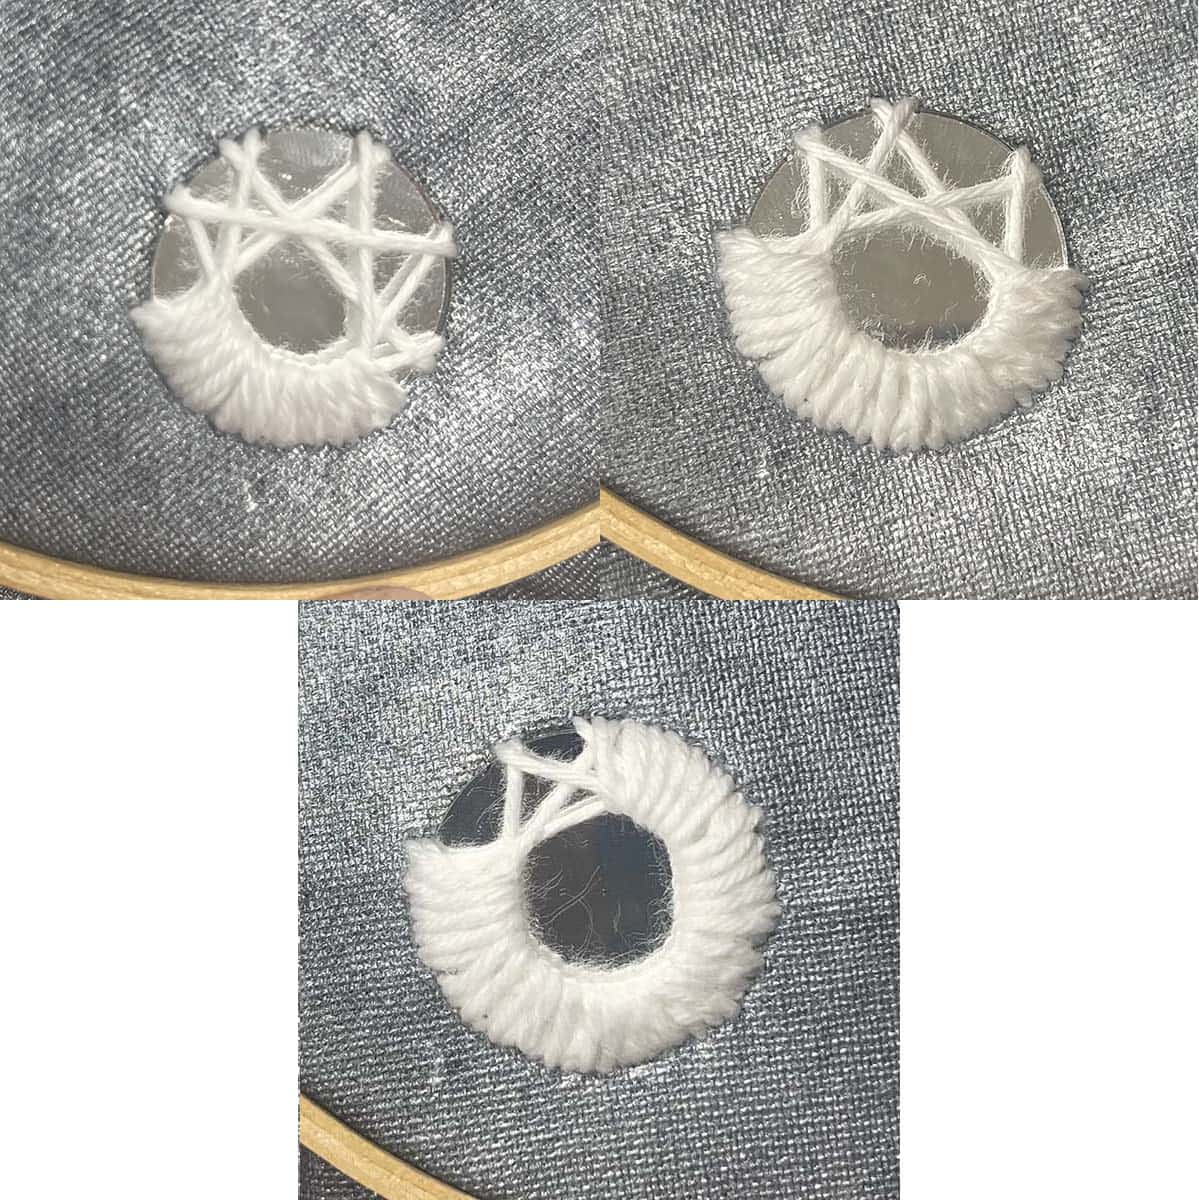
16. When you have completely made it around the mirror with the stitches, go to the back of the fabric (the inside of the bag). You should have a pretty neat embroidered circle. Push the needle through several of the loops a few times to secure the end and cut the thread, leaving a small tail.

17. Repeat steps 8-16 for the second eye.
18. Once you finish both eyes, consider moving the hoop to be more centered on the mouth mirror. Since it is further into the bag, I found it was easier when I moved the hoop lower. Repeat steps 8-16 for the mouth mirror.
18. When all 3 mirrors are stitched on, remove the embroidery hoop. As you can see, you will have creases from the hoop. Put the bag on an ironing board, place tissue paper on top of it, and iron out the creases (TIP: start with a lower temp and gradually raise the heat until the creases come out).
FINISHING THE EDGES OF THE GHOST
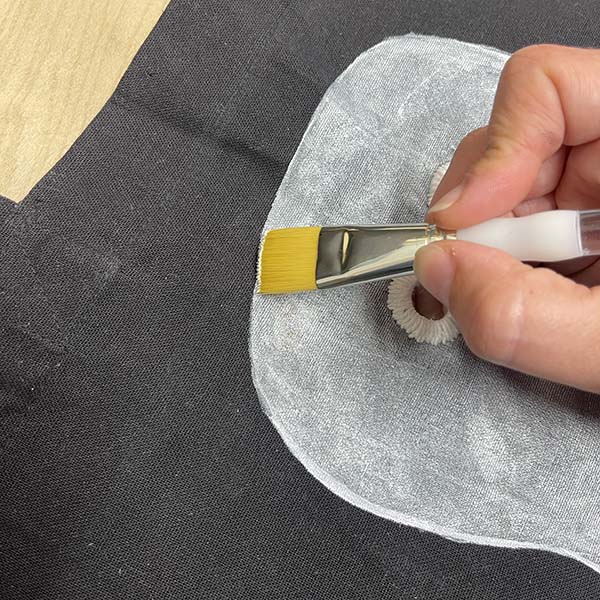
19. This step is totally optional, but I thought the face stood out better when I painted the edge of the ghost with white fabric paint and my handy flat brush. Personal preference, but one way to finish it.
Once the paint dries you have a fun canvas trick or treat bag with cool reflective, mirror face that is durable enough to hold all of your Halloween candy or any other goodies this Halloween season. Enjoy!